
The days are getting shorter, the weather is getting cooler, and winter is right around the corner. This is the time of year when we all begin craving the sights, smells and sounds of nostalgic homemade dessert creations.
“With it finally being Autumn, I have to go with something fall-inspired. My mom makes the best spiced pumpkin bread. It's sweet and spicy and just the perfect autumn treat! I always look forward to it when I visit for the holidays,” IUPUI student Delaney Proctor said.
The Campus Citizen is here for students with simple, fast and satisfying dessert recipe ideas. Matching nostalgic memories with favorite flavors is a must for bringing the comforts of home to student life. After all, a little bit of sugar can give you that extra jolt of energy for those long study sessions.
Study breaks are essential when you find yourself burning the candle at both ends. IUPUI students have their go-to favorite flavors for microwavable dorm mug cakes and the more easy-bake advanced desserts. A popular flavor of choice for any dessert is chocolate.
Whether you are living in a dorm or an apartment near campus, these recipes are easy solutions. Just a bit of pre-planning for the ingredients is all you need and you will have dessert snacks available anytime on demand.
“Dessert ingredients play a crucial role in creating the perfect sweet treat. The choice of ingredients determines the flavor, texture, and overall quality of the dessert,” top chef of the Stubbord Seed, Jermey Ford said.
Pick a recipe. Gather the ingredients and viola. Grab your favorite Jaguar mug or dish. Enjoy!
Chocolate Brownie Mug Cake
Source: Chocolate Covered Katie

Photo Courtesy of Chocolate Covered Katie
Ingredients:
1 tbsp unsweetened cocoa powder
2 tsp Dutch cocoa or additional regular
3 tbsp spelt, white, or oat flour (Here’s a Keto Mug Cake Recipe)
2 tbsp sugar, or sub erythritol if desired
Scant 1/4 tsp baking powder
1/8 tsp salt1 tbsp oil or nut butter (some readers sub applesauce or banana)
3 tbsp milk of choice
1/2 tsp pure vanilla extract
Instructions:
If baking, preheat oven to 350 F. Combine all ingredients in a mug or 1-cup dish (or two 1/2-cup dishes). Either bake for around 14 minutes, OR microwave until set. Microwave times will vary depending on wattage and if using one or two dishes – I cooked mine for one minute, followed by two 10-second increments.
Notes:
If you want to remove the brownie mug cake before eating it, be sure to grease the mug before starting. If you can’t find Dutch cocoa, subbing additional regular will still work; it will just have less of a brownie flavor. I haven’t tried subbing applesauce or banana for the fat and therefore can’t vouch for the taste of that substitution. View Nutrition Facts.
Peanut Butter Mug Cake
Source: Taste Better from Scratch
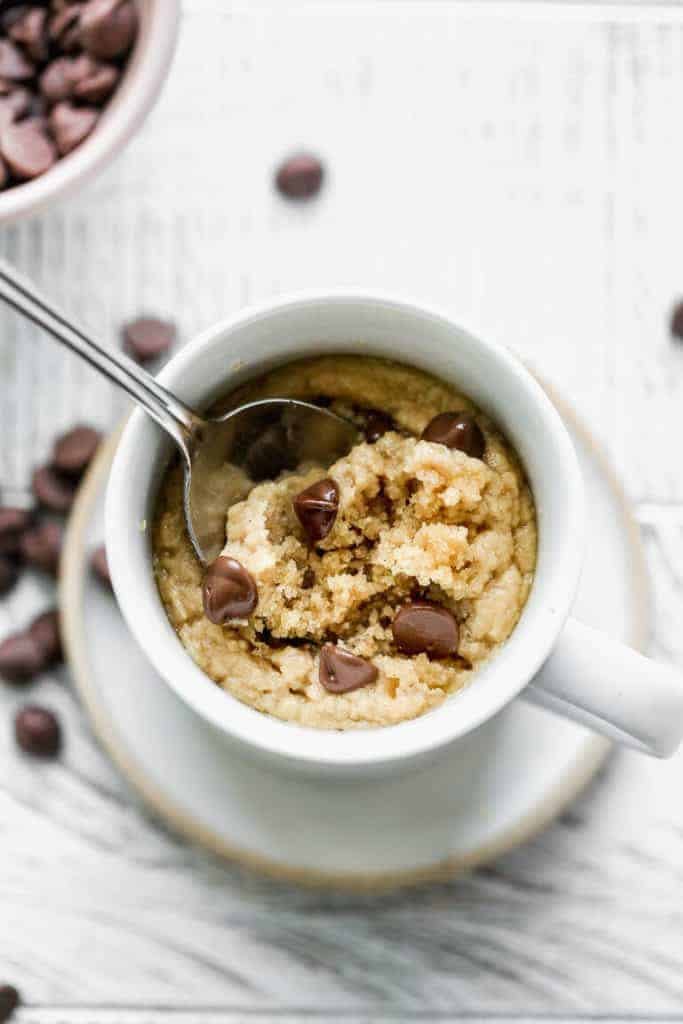
Photo Courtesy of Lauren Allen, Tastes Better from Scratch
Ingredients:
¼ cup all-purpose flour
2 1/2 Tablespoons granulated sugar
¼ teaspoon baking powder
2 Tablespoons milk
1 Tablespoon oil or melted Butter
2 Tablespoons peanut butter
Dash vanilla extract
1 Tablespoon chocolate chips, or a mini Reese’s PB cup
Instructions:
Add flour, sugar and baking powder to a mug and stir together. Stir in milk, oil or melted butter, peanut butter and vanilla extract until smo oth, being sure to scrape the bottom of the mug. Stir in chocolate chips. Cook in microwave for 70-90 seconds (until cake is just set, but still barely shiny on top). Allow to rest in the microwave for one minute before consuming.
Notes:
Because all microwaves are different, it’s difficult to give a precise cooking time. Start with 70 seconds, wait one minute while it cools, then look to see if it is set. Add an additional 15-25 seconds if needed. Allow it to rest in the microwave for oneminute. The trick with mug cakes is to stop cooking the cake earlier than you think, because you want it to be soft on the inside, and the cake will also continue to cook as it cools.
Variations:
Swap the chips: sub peanut butter chips, white chocolate chips, toffee bits, Reese’s Pieces, chopped Reese’s Peanut Butter Cups, etc.
Add Nutella: add a spoonful of Nutella before microwaving.
Chocolate PB mug cake: add 1-2 teaspoons of cocoa powder.
Gluten-free: substitute gluten-free flour
Pumpkin Mug Cake
Source: Taste Better from Scratch

Photo Courtesy of Lauren Allen, Tastes Better from Scratch
Ingredients:
¼ cup all-purpose flour
3 Tablespoons granulated sugar
1/8 teaspoon ground cinnamon
¼ teaspoon pumpkin pie spice
¼ teaspoon baking powder
Pinch salt
2 Tablespoons milk
1 Tablespoon canned pumpkin
1 Tablespoon melted butter
Dash vanilla extract
1 Tablespoon chocolate chips, if desired, or serve with a dollop of whipped cream
Instructions:
Add flour, sugar, cinnamon, pumpkin pie spice, baking powder, and salt to a mug and stir together. Stir in milk, pumpkin, melted butter, and vanilla extract until smooth, being sure to scrape the bottom of the mug. Stir in chocolate chips, if desired. Cook in microwave for 70-90 seconds* (until cake is just set, but still barely shiny on top). Allow to rest in the microwave for one minute before consuming.
Oreo Cake Balls
Source: Elena Besser-University Spoon
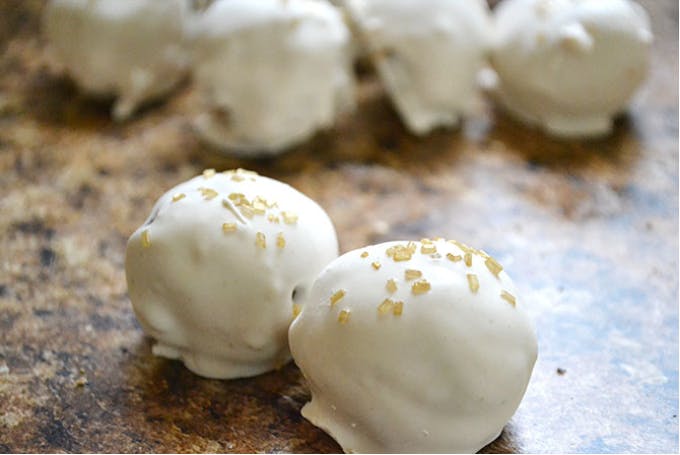
Photo Courtesy of Rae Steinbach, Spoon University
Ingredients:
-
1 package of Double Stuffed Oreos
4 oz of cream cheese, softened
1 package of white chocolate chips
1 package of semisweet chocolate chips (optional)
Instructions:
Place Oreos in a plastic bag. Crush Oreos with a textbook or your hands until they are finely crushed. Pour the Oreos out into a bowl and add the cream cheese. Massage cream cheese into the Oreos with your hands until you get a dough-like texture. Shape the dough into bite-sized balls with your hand and lay them out on a lined baking sheet. Chill Oreo balls in the refrigerator for one hour. Melt the white chocolate chips in the microwave for one minute. Mix the melted chocolate until it takes on a smooth consistency. Add 4-6 drops of red food coloring and mix until you get the color you want. Dip the cold Oreo balls into the white chocolate and coat their surfaces. Place the chocolate-dipped desserts back on a lined baking sheet and chill them in the freezer for five minutes. Optional step: Drizzle the Oreo balls with milk chocolate. Serve chilled
No-Bake Peanut Butter and Chocolate Bar
Source: Katie Zizmor-University Spoon

Photo Courtesy of Rachel Connors, Spoon University
Ingredients:
14 oz sweetened condensed milk
1 1/2 cup chocolate chips
1 1/2 cup peanut butter chips
Instructions:
Line a baking sheet with tin foil and spray with cooking spray, put to the side. In a bowl, combine the chocolate chips and 7oz of sweetened condensed milk. Microwave for around 30-45 seconds and stir until it has the consistency of fudge. Spread the mixture onto the baking sheet. In another bowl, combine the peanut butter chips with the rest of the canned sweetened condensed milk. Microwave as before until it is a similar consistency. Carefully place on top of the chocolate mix. Let sit at room temperature for about 20 minutes. Then slice into even squares. Place the squares on top of each other to create separate stacks
Cookie Dough Bowls
Source: Rachael Herrscher-Today’s Mama

Ingredients:
Your favorite ice cream
Chocolate chip cookie dough
Consider using mini chips, or mini M&M’s instead of regular-size chips for a more even texture and baking
Muffin tin
Instructions:
Split the cookie dough into two equal portions. Roll out the first portion with a rolling pin and cut into circles slightly larger than the bottom of each hole in the muffin tin. Roll the second portion into 12 small balls. Mold your cookie bowls around an upside-down muffin tin. We recommend creating a base by placing a small ball of cookie dough on top of each cup and then wrapping it with a circular cutout of flattened cookie dough. Bake according to cookie dough instructions and let cookie bowls cool. Add scoops of ice cream
Whether you make a dessert to help you focus your energy on studying or just to enjoy while chilling watching the television, students on a budget and limited cooking space will find these easy-to-prepare dessert recipes fulfilling, fun, and easy to clean up.

Juneteenth marks the long road to freedom
By Salsabil F. Qaddoura and Zariya O’Yanna Burnes | June 19Juneteenth, shortened from "June Nineteenth," is a federal holiday that commemorates the emancipation of enslaved African Americans. Celebrated on June 19, it honors the anniversary of the day in 1865 when Union troops arrived in Galveston, Texas, to announce that the last enslaved people in the state were free. Widely observed as an African American holiday, Juneteenth marks the end of slavery in the United States.

Pride Month spotlights LGBTQIA+ artists shaping music
By Zariya O’Yanna Burnes | June 3June is Pride Month, a time to celebrate LGBTQIA+ culture, honor the history of the movement and support LGBTQIA+ people and organizations. The monthlong observance honors the 1969 Stonewall Uprising in Manhattan, widely considered a turning point in the LGBTQIA+ rights movement in the United States. The first Pride march in New York City was held June 28, 1970, on the first anniversary of Stonewall.

Hannah Montana 20th Anniversary Special: The highs and lows
By Olivia Arnold | April 8On March 24, 2006, the world met Hannah Montana: a teenage girl living a secret double life. At just 13 years old, Miley Cyrus became the face of one of the most-watched Disney Channel shows of all time.